

Has your beautiful orchid’s green leaves turned a shade of yellow, and you’re not sure why? This happened to my own orchid when I first got into growing houseplants, so I did my research, and I’ve even spoken with some specialist orchid growers who taught me how to pinpoint the reason for my orchid’s leaves turning yellow and what to do to save it…
In this article, I share with you everything I’ve learned from my experiences of growing and saving orchids…
I discovered that the most common reason orchid leaves turn yellow is that the roots are dying and can no longer transport water or nutrients around the orchid. This causes the orchid leaves to turn yellow, indicating stress from overwatering or drought. Orchids can also turn yellow because of temperatures colder than 55°F and sunburn.
However, there are several other reasons why your orchid leaves are turning yellow, so I created a list to help you identify the cause of your yellowing leaves...
- Orchids Leaves turn yellow at the bottom of the plant as they age. This does not indicate there is anything wrong with your plant!
- Watering too often causes root rot (Orchids should only be watered once every 7-14 days).
- The potting medium retains too much moisture, resulting in root rot (the orchid should be planted in a potting medium composed of pine bark chippings. Moss and ordinary potting soil retain too much moisture around the roots for the orchid to tolerate).
- Orchids planted in pots without drainage holes in the base (orchids do not tolerate water pooling around the roots due to decorative outer pots without drainage, or saucers and trays that retain water as water should be able to freely escape from the base of the pot).
- Orchid is not watered often enough or watered too lightly (a lack of water kills the orchid’s roots, so they can no longer supply the leaves with water and nutrients, which causes the leaves to turn yellow).
- Too much sun scorches the leaves yellow (orchids should be located in bright, indirect as their leaves are sensitive to sun damage).
- Regular houseplant fertilizer burns the orchid’s roots and turns the leaves yellow (orchids require an orchid-specific fertilizer, as regular houseplant fertilizer is too strong).
- Temperatures colder than 55°F can turn orchid leaves yellow (orchids are very sensitive to cold temperatures).
- Orchids turning yellow after repotting due to transplant shock or root rot (a fluctuation in conditions can cause shock resulting in yellow orchid leaves as a sign of stress.
In my experience, orchids turn yellow because their roots are dying or because the environment they are in is contrary to the preferred conditions to which they are adapted. Keep reading to learn why your orchid leaves are turning yellow and how to save it…
Your Orchid Leaves Turn Yellow as They Age
So we need to acknowledge that no matter how well your orchid is cared for, the leaves are going to eventually turn yellow, which, I can assure you, is related to age rather than anything else.
Here’s what this looks like…
What happens is that the larger lower leaves tend to turn yellow and go thinner, eventually they turn brown and fall off.
But how do we know this is just aging leaves? As long as the rest of your orchid looks healthy then we can attribute this to age. So look at the roots, are they green to light gray in colour? Are the rest of the leaves green?
Then great! you have nothing to worry about!
Pro tip: Just let the leaf fall off of its own accord. In my experience, this usually takes around 3 weeks. Do not force it off, as you may damage the orchid unnecessarily.
Orchid Leaves Turning Yellow due to Root Rot (Overwatering)
This next one is not so innocuous, I’m afraid!
Orchid leaves turn yellow because root rot is caused by overwatering or slow-draining soils. Saturated soil starves orchid roots of oxygen, causing them to die. The dying orchid roots can no longer transport nutrients and water around the orchid, causing the leaves to turn yellow.
Our orchids are epiphytes, which means they grow on trees or in loose aggregate rather than in soil.
Therefore our orchids require an aerated potting medium to allow enough oxygen to circulate around the roots so that the roots can respire and function properly.
So, with this in mind, we need to consider that our orchids are adapted to grow in conditions with excellent drainage. Orchids do not tolerate damp soil, which causes the roots to rot.
Here’s the technical explaination I learned from the experts: Watering orchids too often, limits the oxygen around the roots (which is required for root respiration) and promotes the conditions for root rot. Once the roots have died back they can no longer transport the water and nutrients around the plant that helps keep the orchid healthy which causes the leaves to turn yellow as a sign of stress.
However, we also need to acknowledge that potting mediums that retain too much moisture (such as moss and ordinary potting soil) also have the same effect as overwatering in that they limit the oxygen available around the roots, which causes them to shrivel and die back, resulting in the leaves turning yellow.
The potting mediums do not necessarily have to retain too much moisture, but they may just be too compact and lack the porous qualities that the orchid requires for the roots to function properly. (This happened to me before when I started my houseplant journey. I firmed the potting medium too much around the roots, thinking it would be good for stability!)
I had grown orchids in peat moss and pine bark and noticed my orchids did not suffer from problems associated with overwatering when grown in bark.
I learned that orchids should ideally be potted in pine bark as this is the potting medium that most closely resembles the growing conditions of the orchid’s preferred environment.
The large size of the pine bark chippings allows plenty of oxygen to circulate around the roots for efficient root respiration and promotes excellent drainage, which significantly reduces the risk of root rot even if you are overwatering the orchid.

The pine bark chippings absorb moisture, which then evaporates so that the roots can absorb the water vapor. This process helps us mimic that of orchids uptaking water in their native environment.
I learned (from some trial and error!) that moss and potting soil, due to their much smaller particle size, tend to deprive the roots of oxygen and hold too much moisture around the roots for orchids to tolerate, resulting in yellow leaves.
My Tips for Saving Orchids with Yellow Leaves Due to Overwatering
- Scale back the watering to once every week. If you are watering orchids several times a week, then overwatering is the cause of your orchid leaves turning yellow. I only water my orchids when the top inch of the potting medium feels dry. Typically, I water once every week in Spring and Summer and once every 2 weeks in Fall and Winter, as I find that this meets the orchids’ watering requirements without risking root rot. However, watering frequency can vary depending on several factors. (Read my article on how to water orchids to learn the right watering frequency for your orchid according to the time of year and different conditions).
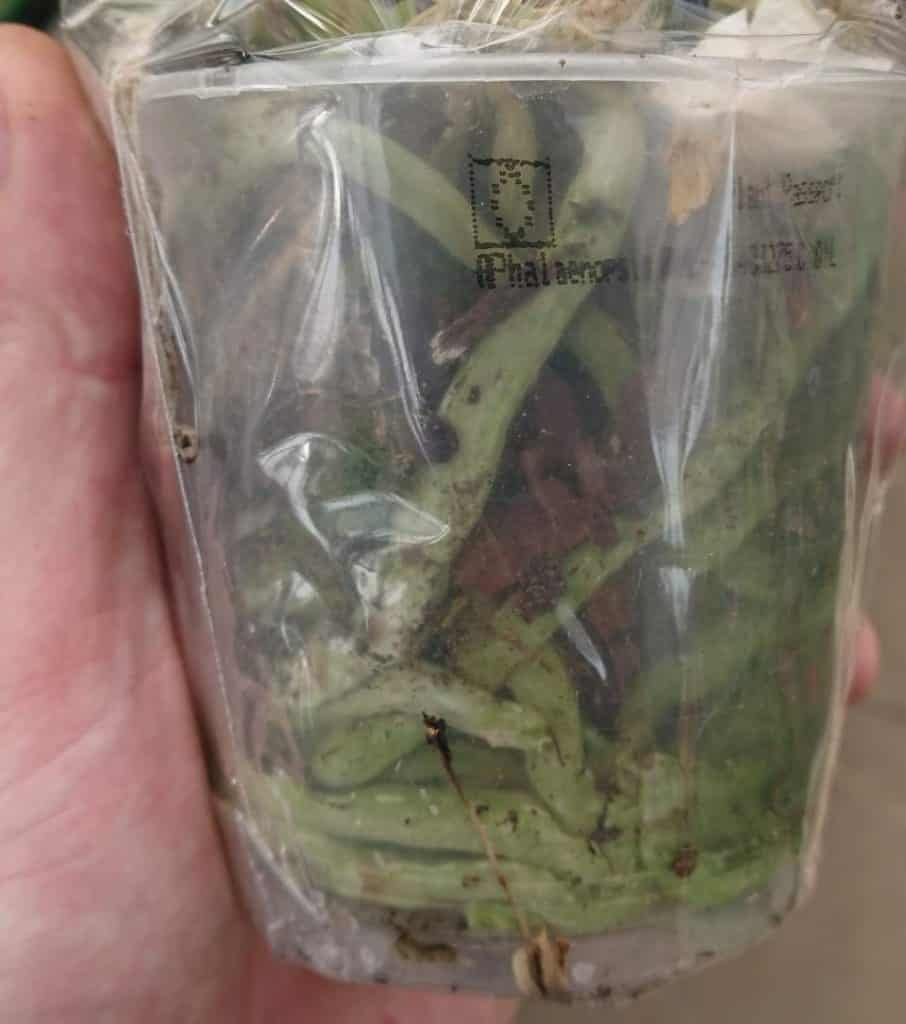
- Remove the orchid from the potting medium and inspect the roots. Here’s my method for determining whether roots are healthy or not: If our orchid’s roots are healthy, then they should appear green (or light gray) and feel plump, which means they are storing watering, functioning properly, and are optimally hydrated. If the orchid roots are thin and shriveled, papery, or brown or yellow with a bad smell, then the roots are rotting and dying back. The dying or dead roots do not revive and can spread rot, so it is important to cut them back to save the orchid.
- Snip off any diseased or dying roots. If the roots are yellow, brown with a mushy texture, or completely shriveled, they are not able to transport water or nutrients (resulting in yellow leaves) around the plant and should be removed to prevent the potential spread of rot.
- Cut the dying roots back the the base of the plant or back to healthy tissue, using a sterile pair of pruners or scissors. Cutting back roots can feel drastic, but I can assure you that orchids are more resilient than their reputation suggests, and they can grow back new, healthy roots that can actually uptake the moisture and nutrients that the orchid requires to revive.
- Replace the potting medium with pine bark (or a prepared orchid potting mix). We need to replant the orchid in a new potting medium, as the old potting medium can host fungal pathogens that cause root rot. What I’ve learned from experience is that Even if your orchid is planted in pine bark, it is good to repot the orchid every 2 years or so with a new potting medium as pine bark breaks down (like all organic matter) over 2 years which can decrease the aeration and drainage from around the roots.
I had to do some experimentation to determine how often to replace the potting medium orchids as I’m sometimes a little cautious because I am aware that repotting can stress a plant, but what I found was that if I repotted my orchids every two years in new pine bark chippings, then they were significantly less likely to develop root rot and therefore the leaves stayed green.
If I left repotting too long I found some roots would start to look unhealthy after around three years, hence why I recommend this proactive approach.
Once you have cut back all the dying and diseased roots and repotted the orchid in a new potting medium, the orchid has a chance to grow new healthy roots and eventually recover.
My own orchid started to recover significantly in the Spring, and I saw it fully recover by the Summer, and it even flowered!
The yellow leaves themselves may not recover as such, eventually turning brown and falling off; however, as we discussed, if there are healthy roots, the orchid can start to grow new healthy green leaves as long as the orchid is cared for correctly.
I personally found this YouTube video particularly helpful as it has a great guide for such as visual process for saving orchids with root rot:
Should I Cut the Yellow Orchid Leaves Off?
No. As a general rule do not cut or pull the yellow orchid leaves off. The yellowing leaves fall off on their own once they have died back due to a lack of nutrients. If you force the leaves off the orchid then you risk damaging the plant unnecessarily.
In my experience, typically orchid leaves turn yellow, shrivel, eventually turning brown, and fall off of their own accord. When the leaves fall off naturally, the point at which the leaf was attached is sealed over they do not leave an open wound which is the case if the leaf is forcibly removed from the plant.
Wounds caused by forcing or cutting the yellowing leaves off can become infected by fungal pathogens that can further damage your orchid, so it’s always best to let the leaves fall off of their own accord.
It is safe to cut back yellow orchid stems back to the base of the orchid after flowering. Read my article, orchid stem turning yellow?
Are Your Orchid Leaves Yellow and Wrinkled? (Drought Stress)
Orchid leaves turn yellow if not watered often enough, watered too lightly, or because of low humidity. Underwatering orchids cause roots to turn white, shrivel, and die back. The shriveled, dying roots cannot transport water and nutrients to the orchid, which causes the leaves to turn yellow.
I know it can seem rather confusing that both underwatering and overwatering can simultaneously be reasons for yellowing leaves! But I think this highlights our need to get the balance of watering right.
Whilst orchids typically require watering less often than other house plants, the potting medium we need to give it a good soak each watering to ensure the orchid roots can draw upon that moisture and absorb water vapor from the air surrounding the roots.
If we water our orchids too lightly, then only the top inch or so of the potting medium is moist, whereas the entire potting medium should be evenly moist after watering to avoid drought stress and yellow leaves.
As a general rule, orchids should also be watered once every 7 days during Spring and Summer and once every 14 days in the Fall and Winter to meet their watering requirements.
This is always the balance of watering that I have found works for me. It took a little trial and error, but I find this works for most home environments.
If our orchid’s roots are healthy then they should appear green after watering and turn a light grey color over the course of a week, with a plump feel to them.
Underwatered orchid roots shrivel up due to lack of water, turn thin and papery, and die back.

Once the roots have died back from a lack of water they can no longer function properly and transport nutrients and water to the leaves which cause them to turn yellow and shrivel in appearance.
We need to be conscious of the fact that low humidity can contribute to leaves yellowing because orchids are accustomed to growing in environments with a typical humidity of 40 – 60 percent.
The humidity in our homes tends to be significantly lower than this, which can sap moisture from the leaves and contribute to the drought stress that results in yellow leaves.
This was a problem for me when I lived in Southern California. The natural humidity in my climate was too low for my orchids, and I often needed the air conditioning, which also lowered the humidity and sapped moisture from the leaves. We also need to think of indoor heating in winter, which can also affect humidity.
How I’ve Saved My Orchids With Yellow Leaves Due to Underwatering
- Place the orchid’s pot in a basin of water for around 10 minutes, ensuring the root ball is fully submerged. This is a great tip I learned from a specialist orchid grower. Submerging our orchids like this allows water to effectively infiltrate the potting medium so the roots can access the moisture they require. We just need to remember to remove the orchid from the basin after 10 minutes and allow the excess water to drain out of the base of the pot.
- Wait until the top inch of the orchid potting medium feels dry before watering again (typically watering once every 7 days). Always water your orchid with a good soak. This can be under the faucet (tap) or, again, in a basin of water to ensure the potting medium is evenly moist.
- As a general rule, water orchids once every 7 days in Spring and Summer and once every 14 days in the Fall and Winter. I always ensure the top inch of the potting medium has dried out between bouts of watering. I’ve experimented with different watering schedules and found that this watering frequency meets the watering requirements for my orchids to keep the leaves a healthy green rather than yellow and avoids the danger of overwatering, which can cause root rot. We achieve the happy medium!
- Mist the orchid’s leaves, stems, and roots once every 2 days. While the orchid is drought-stressed, I recommend increasing the humidity of the air around the orchid by regularly misting it with a spray bottle. The regular misting creates a humid micro-climate that emulates the humid conditions of the orchid’s natural environment. This helped me alleviate the low humidity that caused my orchid stress when I lived in the arid climate of Southern California. I also used a humidifier, which worked really well if I had to go away for a few days.
- Ensure that your orchid is in a room at the right temperature, away from sources of heat or air currents. Orchids prefer a temperature range of 55°F at night and a maximum daytime temperature of 75°F to grow and flower. If the temperature is too high or fluctuates significantly due to indoor heating, then this can increase the rate of evaporation from the potting medium and sap moisture from the leaves faster than it can be drawn up by the roots, causing the drought stress that kills the roots, and turns the leaves yellow.
- Air currents from air conditioning and draughts also lower the humidity to the point of stressing the orchid and exacerbating the conditions that turn the orchid leaves yellow. Ensure that your orchid is in a draught-free area of the house. I had to move mine out of the direct current of air conditioning, which helped it revive.
- Keep orchids out of any direct sun whilst the orchid is stressed from drought. Orchids prefer bright, indirect light, which gives the plant enough light to produce energy and flowers whilst also protecting the sensitive leaves from burning. The more sunlight, the greater the demand for water. If the roots are dying from drought, then they cannot supply moisture at the same rate as a healthy plant, which results in yellow leaves and a dying orchid.
From my experience, correct watering practices are the most important factor in saving orchids with yellow leaves from drought stress. The balance I’ve found that works is not to let the potting medium dry out completely; rather, wait until the top inch of the medium feels dry before watering.
For most houses, I personally find this takes around a week in the Summer and 14 days in the Winter, but I recommend you read my article on watering orchids so that you know how to water your orchid appropriately for your climate and conditions as there are several variables which increase or decrease how often your should water your orchids so that they stay healthy.
Other best practices for caring for your orchid, such as ensuring it is in the optimal temperature range and keeping it away from sources of heat and draughts, should help to save your orchid as it did mine.
What I’ve learned is that as long as some root are alive then the orchid can recover. The yellow leaves may drop off and die back but new leaves can grow once the conditions are more favorable.
Pro tip: This is my favorite hack. Clear plastic pots are a good way to encourage more growth and for the orchid to recover quicker, as the orchid’s roots are capable of photosynthesis to help provide the plant with energy in the absence of healthy leaves.
(Read my article choosing the best pots for growing orchids).
Once new roots grow, new green leaves start to emerge to replace the yellow dying leaves, and the orchid can make a recovery.
(Read my article on how to revive a dying orchid for the full guide).
Orchid Leaves Turning Yellow Because of Too Much Sun
A common reason for orchid leaves turning yellow is because of too much direct sunlight burning the leaves. Orchids are native to forests and grow under a canopy out of direct sunlight. If orchids are in a sunny window, the sensitive leaves can turn yellow because of sunburn.
As we know, our orchids are adapted to growing in forests, they do not tolerate intense sunshine, however, they can grow in some filtered light, but ideally, orchids should be in bright, indirect light as this provides the plant with enough energy for flowering yet does not risk damage from sunburn.
When I first had a sunburnt orchid, the leaves appeared yellow and somewhat brown, scorched, most pronounced on the leaves facing the sun.
What I quickly learned is that whilst my orchid as a whole survived the individual sun burnt leaves do not recover from their scorched appearance or return to green.
The scorched leaves also cannot function properly which means the plant as a whole suffers and leaves often turn brown, die back, and fall off the orchid.
If the plant is sunburnt, it is usually also suffering from drought stress like mine was, as the intense sun dries out the leaves, potting medium, and roots much quicker, causing drooping leaves and stems and harming any blooms.
However, once you have moved the orchid to an area with more favorable conditions, it can recover and grow new leaves.
My Steps for Saving Yellow Orchid Leaves from Sun Burn
- Always place your orchid in an area of bright, indirect light, which reduces heat stress and damage to sensitive leaves. Orchids are adapted to the shade of the forest canopy, so we need to recreate these conditions by avoiding direct sunlight when growing orchids in the home. I place my orchid in my bathroom as it loves the natural humidity, and the frosted glass diffuses the light so that it is once and bright without scorching direct sunlight.
- Wait for the damaged leaves to fall off rather than cutting them off. Typically, the sun burnt yellow leaves turn brown, die back, and fall off from the orchid when they are ready. Removing them yourself can damage the orchid. Mine just dropped off about 3 weeks after it got scorched.
- Ideally, repot your orchid in a clear plastic pot for recovery. As we discussed, orchids are unusual in that their roots are capable of photosynthesizing to provide the plant with energy (usually the function of the leaves). Photosynthesizing is not the primary function of roots, but as the leaves are damaged and not capable of photosynthesizing, this is a useful mechanism for the orchid to recover. Clear plastic pots allow light to the roots, which provides the orchid with energy to function and grow new leaves.
Pro tip: I now place some of my orchids in a room with a south-facing window that has a sheer curtain that diffuses the light and creates the optimal bright light conditions without risking sunburn.
What happened with my orchid is that it grew new leaves in the Spring (which are usually smaller) and I was consistent with my care. Eventually, my orchid fully recovered, and to look at it, you wouldn’t have known it was at any point damaged.
How quickly your orchid recovers from sun burnt yellow leaves depends on the severity of the damage. If some leaves are damaged, yet some are protected by shade then the orchid usually recovers much quicker.
If all the leaves are damaged and fall off, the orchid can still show signs of recovery over the following weeks but on a longer time scale with a slower rate of recovery.
Too Much Fertilizer Turns Orchid Leaves Yellow
It is super important to take into account that orchid roots are more sensitive than most houseplants and can burn and die back if you use ordinary houseplant fertilizer.
If you have applied too much fertilizer then this burns the roots of orchids causing them to die back. The burnt roots are no longer capable of transporting water and nutrients around the plant which causes the orchid’s leaves to turn yellow as a sign of stress.
Orchids are not necessarily heavy feeders, but in my experience, orchids look their best with a specially formulated orchid fertilizer that supports healthy growth and encourages flowering.
Specific orchid fertilizer contains all the nutrients, at the right concentration for orchids to thrive and reduces any risk of the roots burning or excess salts accumulating in the soil which can interferes with orchid roots ability to uptake water, both of which can turn the leaves of orchids yellow.

If the fertilizer you are using is too strong or you are using it too often, it can cause the leaves of the orchid to grow floppy and not display flowers.
My Tips for Saving Orchids With Yellow Leaves due to Excess Fertilizer
- Scale back the use of any fertilizer and wash the orchid roots and potting medium under the faucet (tap) for around 10 minutes with a gentle flow of water. This helps to dissolve the excess salts that can accumulate with frequent use of fertilizer. With less salt in the potting medium, the roots are better able to uptake water when required. However, I should note that this is a short-term solution, and ideally, the potting medium should be changed for the orchid to fully recover.
- Let the water drain through the drainage holes and allow the top inch of the potting medium to dry out over the course of a week before watering again.
- After a week, it is a good idea to inspect the roots of your orchid. This is easy if you have a clear plastic pot like I have, but if not, take the orchid out of the potting medium to inspect its roots. The orchid’s roots should be green or light gray and should feel plump, which indicates they are healthy.
- If any roots are brown, black, or turned thin and white, then they are dying back. I recommend snipping these roots back to the base of the orchid, as these roots are no longer able to transport water or nutrients around the orchid.
- Repot your orchid into a new potting medium of pine bark chippings or a special orchid potting mix (as we’ve discussed, I would avoid moss as it retains too much moisture and promotes the conditions for root rot). The new potting mix does not have the accumulated salts or any other harmful effects of excess fertilizer, so the orchid has a better chance of recovery.
- Any leaves that have turned yellow are likely to die and fall off of their own accord. I must warn you not to attempt to remove the leaves whilst they are still attached, as this can damage the orchid.
With all the best care practices for orchids, your orchid should recover over the next few weeks, with new leaves beginning to emerge in Spring and Summer, however, it depends on the severity of the damage to the roots.
It is important to emphasize that you should use a specially formulated orchid fertilizer (available from garden centers and on Amazon) when feeding orchids rather then regular houseplant fertilizer.
As we talked about, our orchids are epiphytes (which means they like to grow on trees and often attain nutrients from rainwater or water vapor around them in their natural environment), and their roots are far too sensitive for ordinary fertilizer.
Special orchid fertilizer applied at the correct frequency and the right quantity supports healthy orchid growth and promotes flowering, so always follow the manufacturer’s instructions.
Cold Temperatures Cause Orchid Leaves to Turn Yellow
Orchids are very sensitive to cold temperatures and require a temperature range of 55°F at night and a maximum daytime temperature of 75°F.
Whilst they can tolerate the occasion dip in temperature below 55°F, any sustained period under 55°F can cause the orchid leaves to turn yellow as a sign of stress.
This often happens when an orchid is in a draught or near a cold window, particularly if the leaves are in contact with a cold window pane.
Sometimes at night, my window sill is definitely colder than 55°F, but my orchid is fine as this is only a temporary dip in temperature rather than a sustained cold period.
We also need to know that cold temperatures also cause the orchid potting medium to stay moist for longer around the roots, which promotes the conditions for root rot.
As I’ve said, orchids are more hardy than they are usually given credit for, but unfortunately, due to their sensitivity to cold, it is much more difficult to save an orchid that has suffered cold damage.
The prospect of recovery depends on the extent of the cold damage to the orchid. With severe damage, the orchid is likely to die back and not recover, whereas, with some light damage to one or two leaves that may have been in contact with a cold window, the orchid can recover.
To give the orchid the best chance of recovery, I advise that you ensure that it is in a room with stable temperatures that stay between 55°F and 75°F and follow all the best care practices, such as watering once every 7-14 days, placing the orchid in an area of bright, indirect light.
I would avoid using fertilizer whilst the orchid is under stress, as this can promote foliage growth at a time when the plant is already under strain.
If new green growth emerges in the Spring and Summer, then your orchid should recover.
Are Your Orchid Leaves Turning Yellow After Repotting?
This happened to me several times, and I have had plenty of orchids to experiment with to get the formula right!
In my experience, the most common reason orchid leaves turn yellow after repotting is transplant shock or planting in potting mediums that retain too much moisture. Yellow leaves indicate stress due to fluctuating temperature, humidity, air currents, levels of light, or too much moisture around the roots.
Repotting or moving your orchid can mean changing the environment for the orchid, which is at odds with its preferred conditions.
To save it, we have to correct the environmental conditions that cause stress.
Orchids should be repotted once every 2-3 years because the roots of orchids require a particularly areaed potting medium to allow oxygen to circulate the roots for root respiration. Pine bark chippings are the best potting medium for orchids due to their aerated porous structure that promotes good drainage and keeps the roots healthy.
This is the biggest mistake to avoid…
If you have repotted your orchid into moss or potting soil then these materials retain too much moisture around the roots and deprive the roots of oxygen which causes the leaves to turn yellow and the orchid dies back.
Therefore, we should always pot our orchids in pine bark potting mediums (or special orchid bark-based potting mixes) for a healthy orchid rather than moss or ordinary potting soil.
It is also imperative to plant orchids in the appropriate pot. Orchids should always be planted in pots that have drainage holes in the base of the pot.
If orchids are placed in a decorative outer pot or on saucers or trays to prevent water from spilling, it is important to empty the saucer of excess water regularly, as orchids cannot tolerate their roots being in saturated soil.
If your orchids have been in a pool of water due to saucers, trays, or decorative outer pots, then follow the instructions for saving an orchid due to overwatering at the top of the article.
Ultimately what I have found is that as long as the orchid is in bright, indirect light at a temperature of between 55°F and 75°F watered with a good soak once every 7-14 days, kept out of draughts and misted every few days to create a humid micro-climate then my orchid adjusts after repotting in the following weeks.
(Read my article, how to revive a wilting orchid).
Key Takeaways:
- Yellow orchid leaves are most often caused by root rot, which occurs due to overwatering and slow-draining soils. If the orchid’s roots die of root rot, they can no longer transport water and nutrients around the plant, which causes the leaves to turn yellow.
- Orchid leaves turn yellow if there is too much moisture around the roots, which promotes the conditions for root rot. Moss and ordinary potting soil retain moisture and can exclude oxygen from the soil, which causes the roots to die back, resulting in yellow leaves.
- Pine bark is the ideal potting medium for orchids. It allows oxygen to circulate in the roots and has good drainage to avoid root rot and yellow leaves.
- Orchids planted in pots without drainage holes in the base or saucers underneath the pot cause water to pool around the roots, causing root rot, which turns the orchid’s leaves yellow.
- Yellow orchid leaves can indicate that the orchid’s roots have shriveled and died because of underwatering. If the orchid is not watered often enough, the roots die back and cannot uptake the water or nutrients, so the leaves turn yellow as a sign of stress.
- Orchid leaves turn yellow because of sunburn. Orchids have adapted to growing in the shade in their natural environment therefore orchid leaves are very sensitive to direct sunlight. If orchid leaves are exposed to full sun they scorch and turn yellow.
- Orchid leaves can turn yellow because of too much fertilizer. Orchids are not heavy feeders, so if fertilizer is used too often or in a concentration that is too high, then the roots can burn, and no longer function, which results in the orchid leaves turning yellow and dying.
- Orchids can turn yellow if exposed to temperatures cooler than 55°F. Orchids are very sensitive to cold temperatures. If the orchid leaves are in contact with a cold window pane or a cold room, then the leaves turn yellow, which is a sign of stress.
- Orchid leaves turn yellow after repotting due to transplant shock. A change in potting medium, temperature, airflow, or humidity can all cause leaves to turn yellow as a sign of stress. Repotting orchids in moss or potting soil rather than pine bark can turn leaves yellow, indicating root rot.
One thought on “How to Save an Orchid with Yellow Leaves”
Leave a Reply
Recent Posts
Indoor palm trees are some of the most elegant houseplants you can grow, and they are exceptionally easy to care for once you know their preferred conditions. The key is to mimic some of the...
Monstera deliciosa (Swiss cheese plant) is remarkably easy to propagate in water, and propagation can be a good way to reduce the size of any large and out-of-control monsteras that have outgrown...
I hv a CATTLEYA with a spike, but three leave are yellowish, pseudobulb are shrunken, please advise 🙏🏻